Posts

Sharing OpenVPN connection in Windows 11 with other connections

Open "Control Panel" (by typing "Control Panel" in the Windows search bar and select it). Select "Network and Internet" -> "Network and Sharing Center" -> "Change adapter settings". Right click on the "Local Area Connection" with description similar to "TAP-Windows Adapter V9 for OpenVPN Connect". Under the "Sharing" tab, check "Allow other network users to connect through this computer's Internet connection". In the pull-down menu, select the network that is allowed. Done.

Minimal podman-py code that starts a container

#!/usr/bin/env python3 import json from podman import PodmanClient with PodmanClient(base_url="unix:///run/podman/podman.sock") as client:     #image = client.images.pull('nginx')     mounts = [ {"type": "bind", "source":"/home/opc", "target": "/home/opc", "read_only": False}]     client.containers.run('nginx', name="nginx", detach=True, privileged=True, mounts=mounts)

A-train: All Aboard! Tourism tricks

Saves Basic Default save location C:\Program Files (x86)\Steam\userdata\<steam_user_id>\1685460\remote\ Directory structure scenario\ <-- registered/downloaded scenarios    slot00\    slot01\    ... slot00\ <- auto-save slot01\ <- in-game save 01 slot02\ <- in-game save 02 ... NOTE: The official scenarios in   <Steam Library Folder>\steamapps\common\A-Tourism\A-Tourism_Data\StreamingAssets\  are following the same pattern. Workshop items location:  <Steam Library Folder>\steamapps\ workshop\content\1685460\ <Steam Library Folder>\steamapps\ workshop appworkshop_1685460.acf Compatibility between the Switch and Steam versions of the saves The scenario slots and typical save slots of the Switch version could be used by the Steam version (at least with the latest build as at Feb 20, 2022). The reverse is NOT true. Scenarios and progressed saved with the Switch game version 1.1.3 can NO LONGER be used on Steam. ...

Set up OCI Oracle Linux VMs with xrdp, sound and ibus IMEs

Step 1: Start an Oracle Linux 7 instance on OCI Choose Oracle Linux as the image type as it has the best library support. For the VCN the instance uses, make sure in its ingress security rule tcp/3389 ingress is allowed. Step 2: Install Graphical Desktop and xrdp Basically follow the instruction at https://www.e2enetworks.com/help/knowledge-base/how-to-install-xrdp-on-centos-and-redhat-linux-8-7/ At the step concerning enabling epel, simply go to /etc/yum.repos.d/ and enable the epel repo. At the end, sudo to root and create a password for the opc user. Step 3: Install xrdp-sink Follow the instruction at  https://github.com/neutrinolabs/pulseaudio-module-xrdp/wiki/Build-on-CentOS-7.x Step 4: Install IMEs sudo apt install fonts-noto-cjk fonts-noto-color-emoji dbus-x11 sudo apt install ibus ibus-table-cangjie5 ibus-anthy

Set up Windows Subsystem for Linux on Windows 11

Since Windows 11 Build 22000, the Linux subsystem on Windows supports GUI with audio. This greatly raises the usefulness of the Linux system. In the following we will look at how to set up the Linux subsystem with Chinese support. Step 1: Install Windows Subsystem for Linux. Follow the instruction at  https://docs.microsoft.com/en-us/windows/wsl/tutorials/gui-apps Step 2: Set up fonts and input method Install the necessary languages: sudo nano /etc/locale.gen Remove the comment sign next to the languages you wish to install. sudo locale-gen Install necessary fonts and ibus:  sudo apt install fonts-noto-cjk fonts-noto-color-emoji dbus-x11 sudo apt install ibus ibus-table-cangjie5 ibus-mozc Set up ibus service im-config - OK, Yes, ibus, OK, OK dbus-launch ibus-daemon -drx dbus-launch ibus-setup At General -> Keyboard Shortcuts, you may want to set the input method switch shortcut to <shift>space since the original <super>space conflicts with the Windows one....

Install "Hong Kong Mahjong for Windows XP" on WIndows 10 32-bit and 64-bit

Image
This article will talk about how to install "Hong Kong Mahjong for Windows XP" on WIndows 10 32-bit and 64-bit. When you try to install "Hong Kong Majong for Windows XP" on Windows 10 (e.g. by double-clicking the hkmj1280_inst.EXE file on the CD drive), you may see an error saying that the app can't run on your PC.  In fact, if you try to run the exe file on cmd, you will see the root cause: Unsupported 16-Bit Application. To overcome this problem, you will need to enable 16-bit applications on your Windows 10. Depending on whether your windows is 32-bit or 64-bit, you will need to enable certain windows feature or use a helper program. Determine whether your Windows 10 is 32-bit or 64-bit. Select the Start button usually at the bottom left corner, then select Settings > System > About. Under "Device specfication", check the field "System type". If it is a 32-bit system, you shall see "32-bit operating system". If it is a 64-b...

Run Windows 10 on Mac using an external SSD/USB drive

Image
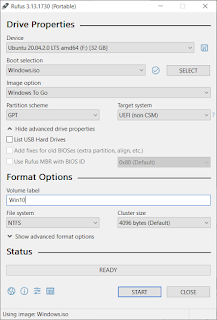
This article shows how you could get a Windows 10 run on Mac using an external SSD/USB drive. I use a Macbook Pro 2020 13 inch to check the procedure. On your Mac, start "Boot Camp Assistant". In the menu bar, Click on "Action" -> "Download Windows Support Software". Have the software downloaded to a storage location for example a USB drive. Shut down your Mac. Use a Windows machine to download Windows 10 ISO at https://www.microsoft.com/en-us/software-download/windows10. Use the Rufus tool available at https://rufus.ie/ to create a Windows 10 USB-to-Go SSD/USD drive.  Once the action is completed, copy the Windows Support Software folder you get in the previous step to root folder of the Windows 10 USB to Go SSD/USD drive. Insert the USB-to-Go SSD/USD drive to your Mac, together with a USB keyboard and a USB mouse. Turn on the Mac with the "Option" key held. Then you could select which drive to boot in. Select the EFI one. Follow the on-scree...

Using PS1 Densha de Go! controller on PS1/PS2 emulator of PlayStation 3

Image
  Using an Arduino Leonardo and a Titan Two, you could connect your PS1 Densha de Go! controller to your PlayStation 3 to play PS1/PS2 Densha de Go! games that supports the controller. Items needed Either {Arduino Leonardo (or equivalent). Note that it has to have at least one 3.3V power output. 6 male-to-female jumper cables} or a  Mayflash SS/N64/PS2 Controller Adapter for PC USB A Densha de Go! controller A Titan Two A few micro USB cables A PlayStation 3 with controller Supported PlayStation 1/2 Densha de GO!! games Provide the PS1 Densha de Go! controller with an USB interface Check the respective section in  https://tylau0.blogspot.com/2020/12/using-ps1-densha-de-go-controller.html Set up Titan Two to convert the signals of the Densha de Go! controller to the ones that the game expects Create a gpc file with content shown at https://github.com/tylau0/DenGo/blob/main/DenshaDeGoPS1ToPS3.gpc  (Arduino approach), or  https://github.com/tylau0/DenGo/blob/main/D...

Using PS1/PC Densha de Go! controller SLPH-00051/TCPP-20001/DGOC-44U on PS4/Switch Densha de Go!!

Image
Items needed A Densha de Go! controller (PS1 original version SLPH-00051, the one-handle version TCPP-20001, or the USB PC version DGOC-44U) A Titan Two A few micro USB cables A PlayStation 4 with controller/A Nintendo Switch with a USB controller A PlayStation 4/Nintendo Switch Densha de GO!! game [Required for SLPH-00051 and TCPP-20001 only]: Either Arduino Leonardo (or equivalent). Note that it has to have at least one 3.3V power output 6 male-to-female jumper cables or a  Mayflash SS/N64/PS2 Controller Adapter for PC USB  (which has issue setting P0 and P4 correctly if the player switches between these two states quickly) Adding a USB interface for the PS1 Densha de Go! controller Do this if you are using PS1 Densha de Go! controller. Arduino approach Cabling Using the jumper cable, connect the Densha de Go! controller with the Arduino Leonardo. PlayStation 1 controller pin numbers --------------------- \ 1 2 3 4 5 6 7 8 9 /  ------------------- Connection to Arduino ...

Using PlayStation 1 Densha de Go controller on emulators

Image
Items needed Arduino Leonardo (or equivalent). Note that it has to have at least one 3.3V power output. A standard PlayStation 1 controller A Densha de Go controller 6 male-to-female jumper cables Procedure Initial Cabling Using the jumper cable, connect the typical PlayStation 1 controller with the Arduino Leonardo. PlayStation 1 controller pin numbers --------------------- \ 1 2 3 4 5 6 7 8 9 /  ------------------- Connection to Arduino Leonardo * PlayStation 1 controller pin 1 (DATA) --> Arduino Leonardo digital port 12  * PlayStation 1 controller pin 2 (CMD) --> Arduino Leonardo digital port 11  * PlayStation 1 controller pin 4 (GND) --> Arduino Leonardo port GND  * PlayStation 1 controller pin 5 (VCC) --> Arduino Leonardo port 3.3V  * PlayStation 1 controller pin 6 (ATT) --> Arduino Leonardo digital port 5  * PlayStation 1 controller pin 7 (CLK) --> Arduino Leonardo digital port 4 Set up Arduino IDE Install the IDE is avail...

Using PlayStation 1 Densha de Go! controller with retropie

Image
This article discusses how we could use PlayStation 1 Densha de Go! controller in emulators, using Retropie as an illustration. In short, the controller is pressing multiple opposite directions simultaneously and we need to register the d-pad as buttons not axes in order for the controller output to be read.   Items needed Standard Raspberry Pi equipment: a Raspberry Pi board, power source and cable, HDMI-capable monitor and HDMI cable, a compatible micro SD card, a USB keyboard and a USB mouse, a USB controller.  A PlayStation 1 typical controller A PlayStation 1 Densha de Go! controller Your favorite PlayStation 1 Densha de Go! game, copied as disk image Some male-to-female jump wires A breadboard Steps Basic Retropie setup Proceed typical Retropie installation routine on the Raspberry Pi. Insert the disk image of the Densha de Go! game into the Raspberry Pi, under  /home/pi/RetroPie/roms/psx by default. Make sure you know how to access to th...

Set up a OpenVPN access server with free resources on Oracle Cloud Infrastructure

Image
A easier approach of setting the whole thing up https://blogs.oracle.com/developers/post/launching-your-own-free-private-vpn-in-the-oracle-cloud#:~:text=Launching%20Your%20Own%20Free%20Private%20VPN%20In%20The,5%20Testing%20The%20VPN%20...%206%20Summary%20 Apply for a free Oracle Cloud free tier Sign up at https://www.oracle.com/cloud/free/ When asked to select a region, pick up that states "always free". After you sign up, sign in at https://www.oracle.com/cloud/sign-in.html Create a new virtual machine instance After log in, click on the hamburger icon on the top left. Then select "Compute" -> "Instances". Click on the "Create Instance" button. In the subsequent screen, name the virtual machine, select an image (recommend: Ubuntu 16.04), select a shape (select a always free one if needed), upload your ssh public key. Then click the "Create" button to create the VM. In the next page, wait until you see the publ...

Traffic analysis using tcpdump and wireshark

Useful capture filters To and from a particular IP host x.x.x.x All traffic in a particular subnet net 192.168.0.0/24 Focus on a particular mac ether dst xx:xx:xx:xx:xx To a particular IP dst host x.x.x.x Capture traffic on particular port only port 53 Capture all traffic except DNS and ARP traffic port not 53 and not arp Useful wireshark display filters Focus on traffic between x.x.x.x and y.y.y.y (ip.src == x.x.x.x and ip.dst == y.y.y.y) || (ip.src = y.y.y.y and ip.dst == x.x.x.x) Focus on particular port tcp.port eq 25 Focus on particular protocol icmp See if there are any retransmitted packets (due to previous loss) tcp.analysis.retransmission or tcp.analysis.fast_retransmission Look at ip traffic only ip Look at vlan traffic only vlan Parts of packets to look at  14:02:09.181190 specto.ksl.com.33248 > quasi.ksl.com.ftp: S 1191864640:1191864640(0) win 5840 (DF) win * 2^wscale: receive buffer size. You could find them in SYN and SYN/...

TCP congestion windows

TCP congestion window: Where in tcpdump to look for window size and scale https://osqa-ask.wireshark.org/questions/27648/how-can-i-get-congestion-window-from-traces https://support.citrix.com/article/CTX113656 https://networklessons.com/cisco/ccie-routing-switching-written/tcp-window-size-scaling iperf and TCP window size https://kb.wisc.edu/uwsysnet/41705 General tcpdump info https://hackertarget.com/tcpdump-examples/ https://www.comparitech.com/net-admin/how-to-use-wireshark/

raspberry pi setup tips

Set up static IP /etc/dhcpcd.conf Remote control raspberry pi and its remote screen using x11vnc https://elinux.org/Screen_Casting_on_a_Raspberry_Pi A better option is x0vncserver https://www.howtoforge.com/tutorial/how-to-start-a-vnc-server-for-the-actual-display-scraping-with-tigervnc/ Start VNC (if using the default realvnc install) vncserver -Encryption PreferOff -Authentication VncAuth Set up Raspberry Pi as digital signage using chromium https://obrienlabs.net/setup-raspberry-pi-kiosk-chromium/ Set up the raspberry pi as info board https://www.cnet.com/how-to/turn-an-old-monitor-into-a-wall-display-with-a-raspberry-pi/ https://magicmirror.builders/ https://www.magicmirrorcentral.com/complete-raspberry-pi-magic-mirror-tutorial/ https://howchoo.com/g/ntcymzbimjv/how-to-install-magic-mirror-on-your-raspberry-pi https://docs.magicmirror.builders/getting-started/installation.html#manual-installation MagicMirror2 tips Location: https://forum.magicmirror.buil...

Extract sound files from steam games

Example: Sleeping Dogs Download Wwise from Github: https://github.com/Vextil/Wwise-Unpacker Extract it to a location of your choice. Locate the sound's pck files In Sleeping Dogs, it could be C:\Program Files (86)\Steam\SteamApps\common\SleepingDogsDefinitiveEdition\data\Audio\SD2\ Move the .pck file to Game Files\ folder of the Wwise extracted files. Click on either Unpack to MP3.bat or Uupack to OGG.bat to start the conversion. Ref: https://steamcommunity.com/app/202170/discussions/0/517142892061333536/

Download media stream available in m3u8 format

Locate the m3u8 stream of the media: Install Firefox plugin "The Stream Detector" or "Video DownloadHelper". Then when you use Firefox to browse pages with media, you will be able to get the link to the m3u8 media streams (master.m3u8). Download the media for 30s: Use ffmpeg: ffmpeg -i " m3u8_full_web_path " -bsf:a aac_adtstoasc -vcodec copy -c copy -crf 50 -t 00:00:30 local_file_location Download the content specified in the master.m3us8 file ffmpeg -i <master.m3u8 file>  -bsf:a aac_adtstoasc -vcodec copy -c copy -crf 50 file.mp4

Using Windscribe VPN service provide with Kodi

Instruction 1) Download VPN Manager. Download and save the repository here : Repository Install it via Systems/Addons/Install from zip (you can put the repository zip on a network attached drive or USB key) Then install VPN Manager via Systems/Addons/Install from repository/Zomboided Addon repository Reference: https://github.com/Zomboided/service.vpn.manager/wiki/01.-Installation 2) Install additional prerequisites Hit escape on your keyboard to back out to the main Kodi screen Scroll over to PROGRAMS -> VPN MANAGER FOR OPENVPN Click on ADD-ON SETTINGS Now comes the fun part! Change the VPN Provider to the VPN you use (I use Private Internet Access) and enter in your Username and Password. Don't change anything else. Scroll to the top and move right until you get to DEBUG. Click ENABLE DEBUG FOR JUST VPN MANAGER Make sure USE SUDO WITH OPENVPN AND KILLALL is set to 'default' or 'always' Click 'ALWAYS USE KODI LOG DIRECTORY FOR OPENVPN LOG ...

MTU

There is kind of a work around to detect MTU problems with TCP using ICMP as a base: http://en.wikipedia.org/wiki/Path_MTU_Discovery PMTU. The caveats are: it doesn't work with UDP, and some scenarios with ICMP being blocked or old operating systems, and some interoperability/network topology situation The problem comes when you want to send more data over this connection - lets say you wanted to send 3000 bytes: your computer would split this up based on your MTU - in this case, two packets of 1500 bytes each, and send them to your ADSL modem which would then split them up so that it can fulfill its MTU. Now your 3000 byte data has been fragmented into four packets: two with a payload of 1492 bytes and two with a payload of 8 bytes. This is obviously inefficient, we really only need three packets to send this data. Had your computer been configured with the correct MTU for the network, it would have sent this as three packets in the first place (two 1492 byte...