Posts

Showing posts from 2013

Enable network in Android x86 on VirtualBox

1) Use VirtualBox bridged network 2) Use eeepc ISO at http://android-x86.googlecode.com/files/android-x86-4.0-RC2-eeepc.iso 3) Make sure when you install Android x86 on the Virtual Disk, install as read/write. 4)  Inside Android, press Alt + F1 and then su -, then vi /etc/init.sh. Add the following line somewhere at the top "setprop net.dns1 8.8.8.8". Then reboot -n. 5) wifi still not working, but browser can go online. Reference

Set a Windows XP SP3 machine as an wifi hotspot

Image
There are quite a few guides on the web that discuss how to share your Ethernet/cable Internet connection with your wifi card on a Windows XP machine, essentially turning a Windows XP machine into a wifi hotspot. However, they have not been updated for the latest Windows XP SP3, which introduces some changes on its Windows Firewall component. This blog post aims to bridge this gap by listing the procedure that is proved to work in this situation. There are altogether four steps: Enable Internet Connection Sharing of your Ethernet/cable connection Set up the wireless network connection a hotspot Start the wireless hotspot Connect to the wireless hotspot

Useful open-source Desktop customization tools

Image
Rainmeter with Omnimo UI (Make pre-Win8 Desktop looks like Windows 8) TICKR (add a news ticker to your Windows/Linux Desktop) Result:

Use mutt to send email in Linux, hiding the real email address

Create a file .muttrc at home directory with the following content: set realname="Eddie" set from="Eddie@unknown.domain" set use_from=yes The command to send email: echo "Email content" | mutt -e 'my_hdr From:Eddie@unknown.domain' -a AttachedFile -s "Email subject" -- recipient@unknown.domain

Change video resolution and format with ffmpeg

ffmpeg -i input.mpeg -s 320x240 output.mpeg ffmpeg -i input.mp4 -s 320x240 output.mpeg   Ref

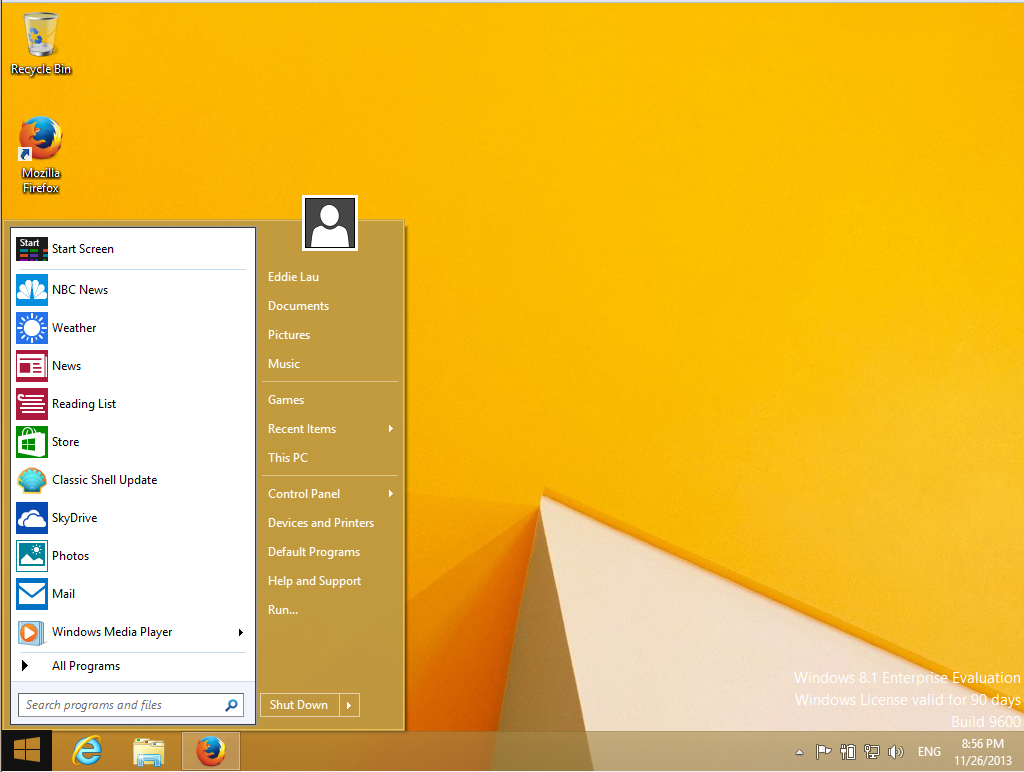
Open source solution to bring classic start menu back to Windows 8/Windows 8.1

Image
An open-source software called Classic Shell can be used to resume the Classic/Windows XP/ Windows Vista/Windows 7 style start menu in Windows 8/Windows 8.1. What you can achieve: Windows 7 style start menu Click on the start icon brings you to the start menu Clicking on the "Start Screen" shortcut at the top of the start menu brings you back to the tile start screen. Procedure Step 1: Download and install Classic Shell . Step 2: Download the Windows 8 style image from this forum post . Step 3: Go to Classic Start Menu Settings under Classic Shell installation Step 4: Under "Start Menu Style" tab, select your favorite start menu style. Check the "Replace the Start button" box. Select "Custom". Then click on the "Pick Image..." button and select the image you have just downloaded in Step 2. Step 5: If you are using Windows 8.1 and you'd like to boot to the Desktop right at the start, click on the "Show all set

Open source pdf editing in Windows

pdf split and merge : Splitting and merging pdf files pdf Edit : Edit pdf content Briss : crop an area of pdf and become another pdf

Beautify Ubuntu Desktop

http://helpdeskgeek.com/linux-tips/change-the-ubuntu-12-04-login-screen-using-ubuntu-tweak/ Slidewall: https://launchpad.net/slidewall http://www.webupd8.org/2012/08/use-wallpaper-clocks-live-earth.html http://www.vladstudio.com/wallpaperclocks/ http://askubuntu.com/questions/134252/is-there-any-alternative-for-windows-gadgets-in-ubuntu

Delete recovery partition of a hard disk in Windows

Step 1. Open the Diskpart application by either typing in "Diskpart" (without the quotation marks) into the search, or type "Diskpart.exe" into Run by pressing the Windows key + R. Step 2. Now with Diskpart open, you must enter the following command lines: I. Type "list disk" without the quotation marks and press enter. II. Type in "select disk 0" and press enter. III. Then type in "list partition" and press enter. IV. Then type in "select partition x" x=the recovery partition you wish to delete (i believe it's 1, i dont recall) replace x with the recovery partition number and press enter. V. Then finally type in "delete partition override" and press enter. Reference

ssh sound over network

http://psung.blogspot.com/2011/09/network-audio-with-pulseaudio-made.html Play octoshape stream with firefox under http_proxy http_proxy=[ [http_proxy_server]] octoshape/OctoshapeClient | PULSE_SERVER=localhost:[[pulse_server_port]] firefox

Customize gnome-classic in Ubuntu 12.04

Increase the heights of top and bottom panels  Install dconf-tools Start dconf-editor. Find the setting org -> gnome -> gnome-panel -> layout -> toplevels. Change the "size" attribute of the bottom-panel and top-panel. Do meta (window) + alt + right click on top panel to add the following applets. "Clock" that can show both day/time and weather "Notification Area" that can show the gcin status. "Indicator Applet" that can show the status of various things such as battery and wifi.

Generate a list of consecutive integers in python

range(10)

Use file lock to ensure no more than 1 instance running

http://stackoverflow.com/questions/2769061/how-to-erase-the-file-contents-of-text-file-in-python-and-c http://stackoverflow.com/questions/220525/ensuring-a-single-instance-of-an-application-in-linux

A good way to list all file names (probably with whitespace) in bash

Typical find . bash command interprets a file with whitespace in name into multiple files. To avoid this problem, use the following construct,   find . - iname "foo*" | while read f do echo ${f} done   Reference     To eliminate leading ./ in the listed file names, change the code above to the following. find . - iname "foo*" | while read f do echo ${f#./} done Reference

apt-get under proxy server

1) Open the Terminal and type the following command       sudo gedit /etc/apt/apt.conf.d/02proxy Note : 01proxy file is not present earlier. 2) Type the following line(in red) in the file:      Acquire::http::Proxy “http://yourusername:yourpassword@yourproxy:yourport″;      Acquire::http::Proxy "http://foss:3189";     3) Save the file and your problem is solved. Reference

rpi dvd to iso in linux

Check where the CD is located in the Linux system > cdrdao scanbus Suppose you get the following which says it is at /dev/sr0 Cdrdao version 1.2.3 - (C) Andreas Mueller /dev/sr0 : Slimtype, DVDRW SOSW-833S , VRS3 Make sure that location is unmounted. > umount /dev/sr0 Do the following command to rip the dvd to iso. > cat /dev/sr0 > /home/tylau0/disc.iso