Posts

Showing posts with the label Computing Fun

Sharing OpenVPN connection in Windows 11 with other connections

Open "Control Panel" (by typing "Control Panel" in the Windows search bar and select it). Select "Network and Internet" -> "Network and Sharing Center" -> "Change adapter settings". Right click on the "Local Area Connection" with description similar to "TAP-Windows Adapter V9 for OpenVPN Connect". Under the "Sharing" tab, check "Allow other network users to connect through this computer's Internet connection". In the pull-down menu, select the network that is allowed. Done.

Using PlayStation 1 Densha de Go controller on emulators

Image
Items needed Arduino Leonardo (or equivalent). Note that it has to have at least one 3.3V power output. A standard PlayStation 1 controller A Densha de Go controller 6 male-to-female jumper cables Procedure Initial Cabling Using the jumper cable, connect the typical PlayStation 1 controller with the Arduino Leonardo. PlayStation 1 controller pin numbers --------------------- \ 1 2 3 4 5 6 7 8 9 /  ------------------- Connection to Arduino Leonardo * PlayStation 1 controller pin 1 (DATA) --> Arduino Leonardo digital port 12  * PlayStation 1 controller pin 2 (CMD) --> Arduino Leonardo digital port 11  * PlayStation 1 controller pin 4 (GND) --> Arduino Leonardo port GND  * PlayStation 1 controller pin 5 (VCC) --> Arduino Leonardo port 3.3V  * PlayStation 1 controller pin 6 (ATT) --> Arduino Leonardo digital port 5  * PlayStation 1 controller pin 7 (CLK) --> Arduino Leonardo digital port 4 Set up Arduino IDE Install the IDE is avail...

Using PlayStation 1 Densha de Go! controller with retropie

Image
This article discusses how we could use PlayStation 1 Densha de Go! controller in emulators, using Retropie as an illustration. In short, the controller is pressing multiple opposite directions simultaneously and we need to register the d-pad as buttons not axes in order for the controller output to be read.   Items needed Standard Raspberry Pi equipment: a Raspberry Pi board, power source and cable, HDMI-capable monitor and HDMI cable, a compatible micro SD card, a USB keyboard and a USB mouse, a USB controller.  A PlayStation 1 typical controller A PlayStation 1 Densha de Go! controller Your favorite PlayStation 1 Densha de Go! game, copied as disk image Some male-to-female jump wires A breadboard Steps Basic Retropie setup Proceed typical Retropie installation routine on the Raspberry Pi. Insert the disk image of the Densha de Go! game into the Raspberry Pi, under  /home/pi/RetroPie/roms/psx by default. Make sure you know how to access to th...

Extract sound files from steam games

Example: Sleeping Dogs Download Wwise from Github: https://github.com/Vextil/Wwise-Unpacker Extract it to a location of your choice. Locate the sound's pck files In Sleeping Dogs, it could be C:\Program Files (86)\Steam\SteamApps\common\SleepingDogsDefinitiveEdition\data\Audio\SD2\ Move the .pck file to Game Files\ folder of the Wwise extracted files. Click on either Unpack to MP3.bat or Uupack to OGG.bat to start the conversion. Ref: https://steamcommunity.com/app/202170/discussions/0/517142892061333536/

MegaCli/MegaCli tutorial: Key Concepts and Basic Operations

Basic concepts The basic unit is a physical disk. Each disk can be identified by its enclosure ID and slot number. Multiple physical disks may be grouped to form a logical disk. Each such disk can be identified by its device id , and has its own RAID level . The logical disks are managed by adapters.   The first thing to do is to find how the logical and physical disks are arranged. Show all logical disks: MegaCli64 -LDInfo -LALL -aALL Show all physical disks: MegaCli64 -PDList -aALL Show the hierarchy of logical and physical disks managed by different adapters: MegaCli64 -LdPdInfo -aALL The possible RAID level are: [Primary-0, Secondary-0, RAID Level Qualifier-0] = RAID-0 [Primary-1, Secondary-0, RAID Level Qualifier-0] = RAID-1 [Primary-5, Secondary-0, RAID Level Qualifier-3] = RAID-5 [Primary-6, Secondary-0, RAID Level Qualifier-3] = RAID-6 [Primary-1, Secondary-3, RAID Level Qualifier-0] = RAID-10 Basic operations Remove/Add physical disks/logical disk...

Sleeping dogs definitive edition + xbox360ce

Below please find how I get my PS2 controller to work with Sleeping Dogs Definitive Edition (platform: Windows 8.1 Steam) successfully. Make sure you have Visual Studio 2013 redistributables installed. You can install them from http://www.microsoft.com/en-us/download/details.aspx?id=40784. Download the xb360ce application (the 64-bit library version) at https://code.google.com/p/x360ce/downloads/list Unzip x360ce.App and put x360ce_x64.exe under C:\Program Files (x86)\Steam\SteamApps\common\SleepingDogsDefinitiveEdition\. Download https://x360ce.googlecode.com/svn/trunk/x360ce/Support/x360ce.gdb and put it under C:\Program Files (x86)\Steam\SteamApps\common\SleepingDogsDefinitiveEdition\. Make sure you find the following lines in the file. [SDHDShip.exe] Name = Sleeping Dogs: Definitive Edition HookMask = 0x00000002 Run x360ce_x64.exe that you put to C:\Program Files (x86)\Steam\SteamApps\common\SleepingDogsDefinitiveEdition\. Go to the Game Settings tab. Check the appropriat...

Windows Store can't be opened in Windows servers 2012 R2

If you fail to open the windows store app, try the following: 1) Open a powershell and enter the following command: powershell -ExecutionPolicy Unrestricted Add-AppxPackage -DisableDevelopmentMode -Register $Env:SystemRoot\WinStore\AppxManifest.xml 2) Clean up windows store cache: Run "WSReset.exe". Ref1 , Ref2

Install old Changjie input method in Windows 8.1

The procedure in this reference is basically correct, except that the script has some typos. Below please find the correct script for Changjie input method. Windows Registry Editor Version 5.00 [HKEY_LOCAL_MACHINE\SOFTWARE\Microsoft\CTF\TIP\{B115690A-EA02-48D5-A231-E3578D2FDF80}\LanguageProfile\0x00000404\{4BDF9F03-C7D3-11D4-B2AB-0080C882687E}] "IconFile"=hex(2):25,00,53,00,79,00,73,00,74,00,65,00,6d,00,52,00,6f,00,6f,00,\  74,00,25,00,5c,00,53,00,59,00,53,00,54,00,45,00,4d,00,33,00,32,00,5c,00,49,\  00,6e,00,70,00,75,00,74,00,4d,00,65,00,74,00,68,00,6f,00,64,00,5c,00,53,00,\  68,00,61,00,72,00,65,00,64,00,5c,00,52,00,65,00,73,00,6f,00,75,00,72,00,63,\  00,65,00,44,00,6c,00,6c,00,2e,00,64,00,6c,00,6c,00,00,00 "Display Description"=hex(2):40,00,25,00,53,00,79,00,73,00,74,00,65,00,6d,00,\  52,00,6f,00,6f,00,74,00,25,00,5c,00,53,00,59,00,53,00,54,00,45,00,4d,00,33,\  00,32,00,5c,00,69,00,6e,00,70,00,75,00,74,00,2e,00,64,00,6c,00,6c,00,2c,00,\  2d,00,35...

Run 32-bit executables on 64-bit Linux

Look for the package/library called ia32.

Ubuntu 12.04 wired internet connection no longer works

Image
My solution: Right-click on the "network manager" applet icon on the top of the ubuntu panel. Select "Edit connection". Delete the respective entry under the "Wired" tab. Then depending on your connection type, you may be able to have the connection auto-detected. In that case, click on the "network manager applet icon again and select that auto-detected item (e.g. Auto ethernet). Then it is suddenly all set.

Add back "Show Desktop" icon in Gnome Fallback session of Ubuntu 12.04

Holding both Alt and Super (Windows) keys, right-click on the top or bottom panel. Select the appropriate icon. Reference

Cannot detect blank disc when using brasero in Linux gnome environment

It appears that there is a problem between brasero and the Gnome file manager nautilus. In case you encounter similar problems, use xfburn instead. But that your Linux machine may lose the capability to open a burned DVD disc automatically. In that case, mount the disc by yourself. To load a disc: mkdir /mnt/cdrom mount /dev/cdrom /mnt/cdrom To unload a disc umount /mnt/cdrom

ffmpeg convert from flv to mp4

ffmpeg -i input.flv output.mp4 Ref: here

AutoHotkey: open-source utility to remap gampad input to button input

Please check here for the program. Below is a sample script to translate both gamepad axis and button inputs. ======== ; Autohotkey Script that matches a few joypad buttons to keyboard events ; Instruction: ; 1) Identify the Joypad buttons that you want to use ; The sample script at ; http://www.autohotkey.com/docs/scripts/JoystickTest.htm ; provides a good way for you to find out the mapping ; 2) Modify Part 0 and Part 1 accordingly. ; 3) Enjoy! #Persistent ; Keep this script running until the user explicitly exits it. ; Part 0: turbo key config ; State if any keys need turbo ('Y' if needed) TurboJoy4 = N TurboJoy1 = N TurboJoy8 = N TurboJoy3 = N TurboJoy2 = Y TurboJoy6 = N ; main routine SetTimer, Watch, 5 return ; Watch method Watch: SetKeyDelay -1 ; Avoid delays between keystrokes. ; Part 1: key mapping routine each JoyX to be used ; Joy4 -> 'Q' GetKeyState, Joy4, Joy4 Joy4PPrev = %Joy4P% if Joy4 = D { if TurboJoy4 = Y { Send {Q down} ...

VNC viewer session with gnome session manager on Ubuntu 11.10

Image
The following happens to me since I upgrade my Ubuntu to version 11.10. Using the default config file .vnc/xstartup , I just get a terminal window in my VNC viewer session. To have the gnome desktop session manager back to the VNC viewer session, I have to modify the config file as follows. #!/bin/sh # Uncomment the following two lines for normal desktop: unset SESSION_MANAGER unset DBUS_SESSION_BUS_ADDRESS #exec /etc/X11/xinit/xinitrc [ -x /etc/vnc/xstartup ] && exec /etc/vnc/xstartup [ -r $HOME/.Xresources ] && xrdb $HOME/.Xresources xsetroot -solid grey vncconfig -iconic & x-terminal-emulator -geometry 80x24+10+10 -ls -title "$VNCDESKTOP Desktop" & #x-window-manager & gnome-session --session=gnome-classic & In the following, the value after --session= is the session manager. You may change gnome-classic above to ubuntu-2d for an alternative session manager.

MATLAB Linux install error: /tmp/mathworks_15227/java/jre/glnxa64/jre/bin/java: Permission denied

When installing MATLAB on a Linux system, you may encounter the following error message. Preparing installation files ... Installing ... eval: 1: /tmp/mathworks_15227/java/jre/glnxa64/jre/bin/java: Permission denied My solution turns out to be the following: From the install package, cd to sys/java/jre/ xxx /jre/bin directory. ( xxx could be glnx86 or glnxa64 or something similar) chmod a+x * Execute the install command once again. You should be all set.

Online virtual tour project

Source code: http://charabanc.sourceforge.net/ Strength: just need client-side javascript, navigation experience close to google maps street view Generate stitches from photos: http://hugin.sourceforge.net/ Good simple tutorial to stitch 360-degree photos: http://www.lightspacewater.net/Tutorials/PhotoPano1/PhotoPano1/ A PhD thesis talking about automatic reconstruction of 3D scene and tour paths is here .

Dump a rtmp/mms stream in Linux

If you have rtmpdump in your computer, you may record a rtmp stream using the following command. rtmpdump -r [rtmp_stream] -o [output_file] Example rtmp streams: DBC (Hong Kong) rtmpdump -r rtmp://58.64.197.165/live/dbc2 -o dbc2recording.flv Another example rtmp streams: rthk tv stream rtmpdump -r rtmp://stmw.rthk.hk/livet/livetvma3.stream -o rthktvrecording.flv   Use mimms for mms stream.

Config octoshape to start up on boot

[Optional] Move the octoshape executable downloaded from the octoshape official site to some global location, like /opt/octoshape. Give good permission to typical users for the file there. Write a script named FOO, for example, in /etc/init.d/ directory. (/opt/octoshape/OctoshapeClient). And then run (chmod +x FOO) and then (update-rc.d FOO defaults)

Record octoshape stream with VLC Player

Image
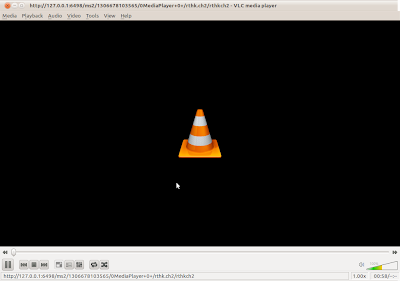
To use VLC player to record an octoshape stream, first you need to figure out the HTTP location of the octoshape stream when it is played in your local computer. To find that out, play the octoshape stream with VLC player. You can check how to do that in Windows here . In Linux, one can do that according to the instruction here , with an additional simple config . For example, when I use the stream rthk.ch2 ., the corresponding HTTP location is shown as the window title. If you choose to record using VLC Player interface, then from the main menu, select "Media" -> "Convert/Save". Under the "Network" tab, enter the network URL in the only text field, and click on the "Convert/Save" button below. In the subsequent window, fill in the destination file name. Click "Start" to start recording. [Updated 2014/07/12] NOTE : The file has to be named with .mp4 as extenstion instead of .mp3 shown in the screenshot below. (i.e. /home/te...