Using PlayStation 1 Densha de Go! controller with retropie
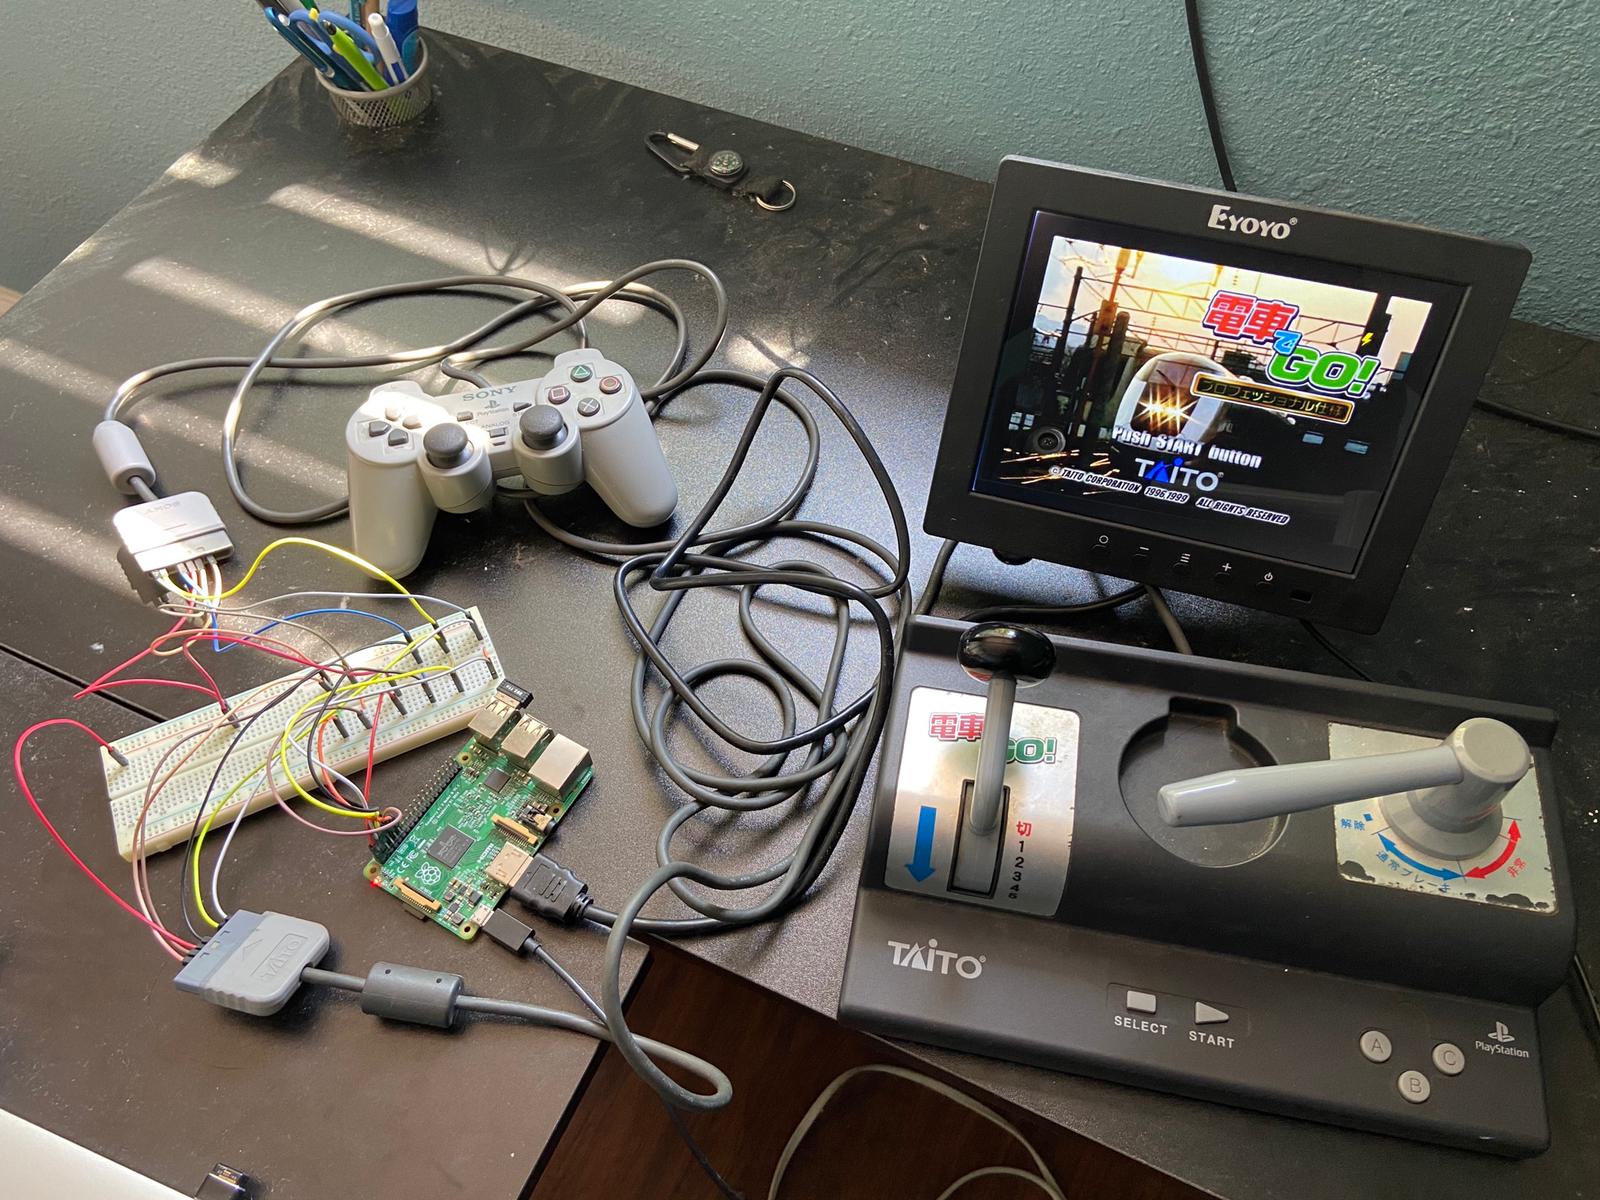
This article discusses how we could use PlayStation 1 Densha de Go! controller in emulators, using Retropie as an illustration. In short, the controller is pressing multiple opposite directions simultaneously and we need to register the d-pad as buttons not axes in order for the controller output to be read.

Insert the disk image of the Densha de Go! game into the Raspberry Pi, under /home/pi/RetroPie/roms/psx by default.
Make sure you know how to access to the Retropie console e.g. using SSH. SSH is not enabled by default. From the main Retropie screen navigate to the "Retropie" system. From here select the "Raspi-Config" utility. Use the Up/Down controls to select "Interfacing Options". Use the right control to highlight "Select" and the B button to activate. Select SSH and select YES -> OK. Then select "Finish" and reboot Retropie.
 For the ports on the Raspberry Pi, refer to the following diagram.

Now add a cable to connect the 3.3V on the Raspberry Pi with the 3.3V of the typical controller.
 Install gamecon driver by selecting "Retropie" in the main menu. Then "RetroPie Setup", "Manage Package", "driver", "gamecondriver".
Enable gamecon driver and recognize the pad cabled to PAD1 as a PSX DDR controller by running the following on a command prompt of your Raspberry Pi.
sudo modprobe gamecon_gpio_rpi map="0,0,0,0,8,0"
Look for the pad index (0-3) of your typical PlayStation 1 controller cabled to the Raspbery Pi by running
ls /dev/input/
You may test your typical PlayStation 1 controller by running the following command.
jstest /dev/input/jsx
where x corresponds to the pad index.
To make the driver load upon reboot, add the following line to /etc/modprobe.d/gamecon.conf
options gamecon_gpio_rpi map=0,0,0,0,8,0
Use your USB gamepad to get into the game. You shall see "PSX DDR controller" as one of the controller loaded. Then quit the game.
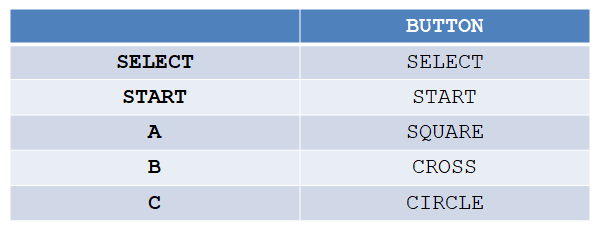
Change the button mapping and disable reset shortcut of the gamepad by editing "/opt/retropie/configs/all/retroarch-joypads/PSX DDR controller.cfg" and "/opt/retropie/configs/psx/PCSX-ReARMed/DenshaPro.rmp".
If your "/opt/retropie/configs/all/retroarch-joypads/PSX DDR controller.cfg" looks like the following:
input_device = "PSX DDR controller"
input_driver = "udev"
input_l_btn = "4"
input_load_state_btn = "nul"
input_start_btn = "9"
input_exit_emulator_btn = "nul"
input_down_btn = "14"
input_r_btn = "5"
input_save_state_btn = "nul"
input_right_btn = "13"
input_state_slot_increase_btn = "nul"
input_select_btn = "8"
input_left_btn = "15"
input_state_slot_decrease_btn = "nul"
input_l2_btn = "6"
input_l3_btn = "10"
input_up_btn = "12"
input_a_btn = "0"
input_b_btn = "1"
input_reset_btn = "nul"
input_enable_hotkey_btn = "nul"
input_r2_btn = "7"
input_r3_btn = "11"
input_x_btn = "2"
input_menu_toggle_btn = "nul"
input_y_btn = "3"
Reference: https://retropie.org.uk/forum/topic/11837/disable-retroarch-joystick-reset-hotkey/5
Then the following game-specific /opt/retropie/configs/psx/PCSX-ReARMed/DenshaPro.rmp would work.
input_libretro_device_p1 = "1"
input_libretro_device_p2 = "1"
input_libretro_device_p3 = "1"
input_libretro_device_p4 = "1"
input_libretro_device_p5 = "1"
input_player1_analog_dpad_mode = "0"
input_player2_analog_dpad_mode = "0"
input_player1_btn_a = "4"
input_player1_btn_b = "7"
input_player1_btn_down = "14"
input_player1_btn_l = "8"
input_player1_btn_l2 = "9"
input_player1_btn_l3 = "12"
input_player1_btn_left = "15"
input_player1_btn_r = "0"
input_player1_btn_r2 = "1"
input_player1_btn_r3 = "13"
input_player1_btn_right = "3"
input_player1_btn_select = "10"
input_player1_btn_start = "11"
input_player1_btn_up = "2"
input_player1_btn_x = "5"
input_player1_btn_y = "6"
input_player3_analog_dpad_mode = "0"
input_player4_analog_dpad_mode = "0"
input_player5_analog_dpad_mode = "0"
Try to run the Densha de Go! game with the typical controller. Once you are pleased with the result, while inside the game change the 3.3V cabling so it is connecting the pin 5 of the Densha de Go! controller instead.

Then you shall be able to control the game using your Densha de Go! controller. Enjoy!
TODO: simplify the button remapping procedure.
Items needed
- Standard Raspberry Pi equipment: a Raspberry Pi board, power source and cable, HDMI-capable monitor and HDMI cable, a compatible micro SD card, a USB keyboard and a USB mouse, a USB controller.
- A PlayStation 1 typical controller
- A PlayStation 1 Densha de Go! controller
- Your favorite PlayStation 1 Densha de Go! game, copied as disk image
- Some male-to-female jump wires
- A breadboard
Steps
Basic Retropie setup
Proceed typical Retropie installation routine on the Raspberry Pi.Insert the disk image of the Densha de Go! game into the Raspberry Pi, under /home/pi/RetroPie/roms/psx by default.
Make sure you know how to access to the Retropie console e.g. using SSH. SSH is not enabled by default. From the main Retropie screen navigate to the "Retropie" system. From here select the "Raspi-Config" utility. Use the Up/Down controls to select "Interfacing Options". Use the right control to highlight "Select" and the B button to activate. Select SSH and select YES -> OK. Then select "Finish" and reboot Retropie.
Densha de Go! controller enablement
Cable the typical PlayStation 1 controller and the Densha de Go! controller to the GPIO ports of the Raspberry Pi except the 3.3V.

Now add a cable to connect the 3.3V on the Raspberry Pi with the 3.3V of the typical controller.

Enable gamecon driver and recognize the pad cabled to PAD1 as a PSX DDR controller by running the following on a command prompt of your Raspberry Pi.
sudo modprobe gamecon_gpio_rpi map="0,0,0,0,8,0"
Look for the pad index (0-3) of your typical PlayStation 1 controller cabled to the Raspbery Pi by running
ls /dev/input/
You may test your typical PlayStation 1 controller by running the following command.
jstest /dev/input/jsx
where x corresponds to the pad index.
To make the driver load upon reboot, add the following line to /etc/modprobe.d/gamecon.conf
options gamecon_gpio_rpi map=0,0,0,0,8,0
Use your USB gamepad to get into the game. You shall see "PSX DDR controller" as one of the controller loaded. Then quit the game.
Change the button mapping and disable reset shortcut of the gamepad by editing "/opt/retropie/configs/all/retroarch-joypads/PSX DDR controller.cfg" and "/opt/retropie/configs/psx/PCSX-ReARMed/DenshaPro.rmp".
If your "/opt/retropie/configs/all/retroarch-joypads/PSX DDR controller.cfg" looks like the following:
input_device = "PSX DDR controller"
input_driver = "udev"
input_l_btn = "4"
input_load_state_btn = "nul"
input_start_btn = "9"
input_exit_emulator_btn = "nul"
input_down_btn = "14"
input_r_btn = "5"
input_save_state_btn = "nul"
input_right_btn = "13"
input_state_slot_increase_btn = "nul"
input_select_btn = "8"
input_left_btn = "15"
input_state_slot_decrease_btn = "nul"
input_l2_btn = "6"
input_l3_btn = "10"
input_up_btn = "12"
input_a_btn = "0"
input_b_btn = "1"
input_reset_btn = "nul"
input_enable_hotkey_btn = "nul"
input_r2_btn = "7"
input_r3_btn = "11"
input_x_btn = "2"
input_menu_toggle_btn = "nul"
input_y_btn = "3"
Reference: https://retropie.org.uk/forum/topic/11837/disable-retroarch-joystick-reset-hotkey/5
Then the following game-specific /opt/retropie/configs/psx/PCSX-ReARMed/DenshaPro.rmp would work.
input_libretro_device_p1 = "1"
input_libretro_device_p2 = "1"
input_libretro_device_p3 = "1"
input_libretro_device_p4 = "1"
input_libretro_device_p5 = "1"
input_player1_analog_dpad_mode = "0"
input_player2_analog_dpad_mode = "0"
input_player1_btn_a = "4"
input_player1_btn_b = "7"
input_player1_btn_down = "14"
input_player1_btn_l = "8"
input_player1_btn_l2 = "9"
input_player1_btn_l3 = "12"
input_player1_btn_left = "15"
input_player1_btn_r = "0"
input_player1_btn_r2 = "1"
input_player1_btn_r3 = "13"
input_player1_btn_right = "3"
input_player1_btn_select = "10"
input_player1_btn_start = "11"
input_player1_btn_up = "2"
input_player1_btn_x = "5"
input_player1_btn_y = "6"
input_player3_analog_dpad_mode = "0"
input_player4_analog_dpad_mode = "0"
input_player5_analog_dpad_mode = "0"
Try to run the Densha de Go! game with the typical controller. Once you are pleased with the result, while inside the game change the 3.3V cabling so it is connecting the pin 5 of the Densha de Go! controller instead.

Then you shall be able to control the game using your Densha de Go! controller. Enjoy!
TODO: simplify the button remapping procedure.
Technical details
Button combinations from the controller
The PlayStation 1 Densha de Go! controller is essentially sending out combinations of buttons to indicate throttle and brake levels.For SLPH-00051


References
http://www.clubncaldes.com/2016/12/psx-denshadego-loconet-controller.html
https://modelrail.otenko.com/arduino/arduino-dreamcast-densha-de-go-controller
In fact, the games use whether both D-pad up and down are pressed to determine whether a Densha de Go! controller is there or not, as discovered by a Twitter user.
https://twitter.com/wakamesoba98/status/1208039666076680193
To solve the problem, one shall take the same solution and the DDR control mat - ask the controller driver to map the different D-pad directions as buttons instead. In Retropie, it could be done by registering the controller as the DDR controller rather than typical PSX controller.
The default DDR controller button mapping doesn't match the one expected by the Densha de Go! controller and indeed typical PlayStation 1 controllers as well. To correct this, I load a fighting game that uses all the buttons and press all the buttons in the game. Seeing what button press leads to what actions, you'll see how the button shall be remapped. I open the retroarch menu (hotkey then 'X') to complete the remapping. I save it to a game-specific rmp file and result in the rmp file presented in the step section.
It happens that simultaneous presses of L1, R1, L2 and R2 will trigger the emulator framework used in retropie (retroarch) to reset the game. Therefore we need to disable that hotkey.


For TCPP-20001


References
http://www.clubncaldes.com/2016/12/psx-denshadego-loconet-controller.html
https://modelrail.otenko.com/arduino/arduino-dreamcast-densha-de-go-controller
In fact, the games use whether both D-pad up and down are pressed to determine whether a Densha de Go! controller is there or not, as discovered by a Twitter user.
https://twitter.com/wakamesoba98/status/1208039666076680193
A need to map D-pad as buttons rather than axes
Note that some accelerator commands requires pressing two opposite D-pad directions simultaneously. With typical USB adapters for PlayStation 1 controllers, the D-pad is mapped to axes rather than buttons. Simultaneous press of two directions that are opposite to each other is not allowed by axes. The implication is that even though the controller does send out the correct signals, the recipient can't interpret the same and thus get the wrong throttle and brake levels. This is indeed exactly what the controllers of Dance Dance Revolution (DDR) series face as well - when one dances on the DDR control mat, he may need to step on opposite directions at the same time.To solve the problem, one shall take the same solution and the DDR control mat - ask the controller driver to map the different D-pad directions as buttons instead. In Retropie, it could be done by registering the controller as the DDR controller rather than typical PSX controller.
The default DDR controller button mapping doesn't match the one expected by the Densha de Go! controller and indeed typical PlayStation 1 controllers as well. To correct this, I load a fighting game that uses all the buttons and press all the buttons in the game. Seeing what button press leads to what actions, you'll see how the button shall be remapped. I open the retroarch menu (hotkey then 'X') to complete the remapping. I save it to a game-specific rmp file and result in the rmp file presented in the step section.
Miscellaneous
Somehow if we connect the raspberry pi to the Densha de Go! controller while opening the game in the emulator, the throttle couldn't get recognized (maybe the emulator doesn't like buttons to be in long-pressed state while starting - which could mean a button failure). Therefore you shall connect the raspberry pi to a typical controller while opening the game.It happens that simultaneous presses of L1, R1, L2 and R2 will trigger the emulator framework used in retropie (retroarch) to reset the game. Therefore we need to disable that hotkey.


Comments
Post a Comment